 Doing 8 shows in five days took a considerable effort but thanks to the HVX200, Firestore, Final Cut Pro, and a great fxphd crew the process was made a bit easier. In part one of a behind the scenes look at our at siggraph coverage, we examine the production process.
We have been working for months to do coverage from SIGGRAPH2007, beginning at NAB where we did dry run recordings and tested the production process. VES was also critically important as I learned numerous things when doing interviews in Los Angeles. In the end, however, the process was really tight as we didn’t receive final confirmation that we would have sponsorship to do the netcasts until early July.
This left a pretty short time to get everything together for the shoot…not to mention I was traveling in Asia and working in a different time zone than most of our possible interview subjects. We knew were going to do 8 10-minute eps over the week — the length of which was determined by the amount we felt could be streamed effectively. With this structure in place, we needed to have at least 8 “major” interviews lined up before heading to San Diego — more in case someone couldn’t make it in the end. The rest of the ep would be filled with shorter stories or coverage of events at the conference. We also knew that there would be things we wanted to cover when we got to SIGGRAPH, so this gave us a bit of pad.
Mike and I have numerous contacts in the industry, so we started with those leads in order to see who would be at SIGGRAPH. Bill Desowitz of vfxworld also helped us with several leads and securing interviews with several folks, including Doug Chiang.
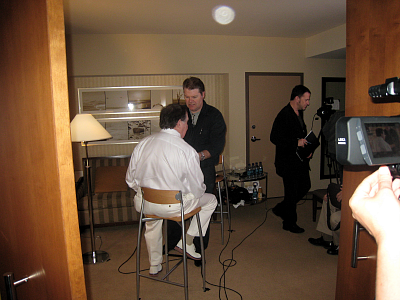
Where would we want to do the interviews? Based upon experiences at NAB and VES, we felt quite strongly that we needed to be set up in a room where we could bring our guests. We booked a suite at the Omni hotel across the street from the convention center. Unlike NAB, where it is a 15 minute walk from one end of the exhibits to the other — it was only a 5 minute walk from the convention to our suite. So it worked out beautifully.
The lights and cameras would already be set up so that all we needed to do is welcome the guest and seat them on the set. This would mean less wasting of their busy schedules as well as give us a controlled environment in which to shoot. All of our guests were quite appreciative of the quick turnaround — and quite impressed with the professionalism of the setup.
We talked briefly about doing a virtual set — but to be perfectly honest I am not a fan of virtual sets and much prefer something shot in camera. The benefit of a virtual set is that you can have several different backgrounds for your talent while shooting in only one location and that makes perfect sense to me. It’s simply that most of these sets scream out to me and I much prefer reality. They have their place…just not here imho. I’d probably prefer to bring in some mottled backdrops and use those to place our on-screen talent and guests in a “different” location. Anyway…end of sidebar…..
To build the set, we got a couple bar stools from the hotel, positioned the cameras, and then set up our lights. We used one Kinoflo and a couple of Lowel Pro lights with gels to balance the color temperature to match the Kinoflow. The lighting and set dressing process naturally takes a bit of trial and error in order to achieve the best results — it’s part of the creative process, especially in a confined space. By the end of the setup day we had a very nice looking set that we new would work well.
We chose to have the simplest background behind the guest in order to make sure the focus was on them and not the environment. We used a two shot for the other camera to enable us to shorten up the interviews — this was quite critical as the show edits needed to be very tight in order to fit into the 10-minute duration.
 For remote shooting at the show, we used a single camera setup with either wired or wireless mics. It was impossible to shoot an interview on the show floor due to the ambient sound, so we either shot out in the hallways or outside. Lavalier mics worked well for the hallway shoots so we were recording two channels (interviewer and subject).
When we needed to shoot on the floor for some reason – or were walking around getting comments from a number of people in a brief period of time, we used handheld mics. This provided a faster turnaround as we didn’t need to wire the interview subject. When you’re in a noisy environment, it ends up being easier to record with one mic — as the second mic would just pick up ambient audio. The mics we had also have a cardioid pattern and it’s amazing how the pickup pattern really does allow you to shoot in a loud environment and end up with decent audio. Lav mics such as the ones we use simply wouldn’t cut it.
In our next installment, I’ll talk about the post process and keeping data backed up…..